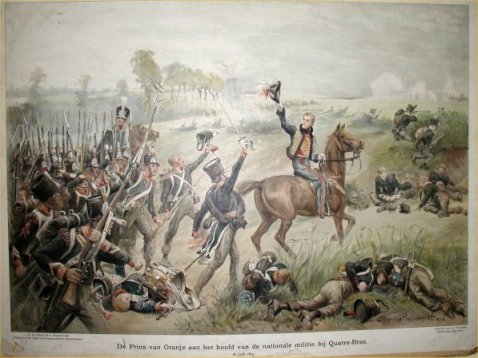
The Prince of Orange leading a counterattack of the 5th Militia Battalion at Quatre-Bras. In the background right some men of the 27th Battalion Jagers can be seen.
As a 1st Lieutenant in the Dutch 2nd Division here at the club, it always struck me how awkward the opening positions of these troops are in Prelude to Waterloo. No matter how well you wanted to handle these Dutch battalions, they were always overrun by the French masses; only in a case with a cautious French officer playing against me, was I at least able to gather most of these battalions and form a defensive line west and east of the Gemioncourt Farm, before they again were attacked and usually routed en masse. Of course, I know there are a lot of succesful Allied players here at the club, who have won the historical Quatre-Bras scenarios. Still, it just didn’t let go of me, and I started researching the correct deployments. To my surprise, it also became clear that the entire French II Corps of Reille was also already present at 2 P.M., when the battle commenced. So now I did not only have an opportunity to design a scenario interesting for Allied players, but for French ones as well.
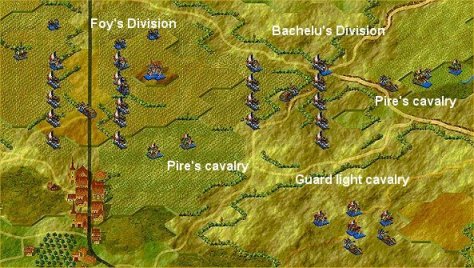
The French opening deployment at 2 P.M.
The opening positions of the French army under Marshal Ney consist of three infantry divisions, the cavalry division under General Piré, and the Corps artillery; the only re-inforcements that have to arrive are the cuirassiers of Guiton’s brigade under command of General Kellermann. The light cavalry division of the Guard is present at the battlefield, but remains fixed the entire scenario, as Napoleon had forbidden them to participate in this battle, as he needed them at Ligny. The Guard Cavalry indeed left the Quatre-Bras area later in the afternoon. The entire French force is screened by a line of skirmishers from the Grande Pierrepont Farm in the west all the way to the east into the Delhutte Wood; they had been actively engaged with the Dutch skirmishers all morning in probing actions and a lively firefight. Due to the terrain design of the map, it is not possible to place the French batteries in such a position that they are able to give an opening bombardment of the Dutch positions. I didn’t want to deviate from this, without distorting the original deployment and have just placed them in a central forward position to where they were at the time.
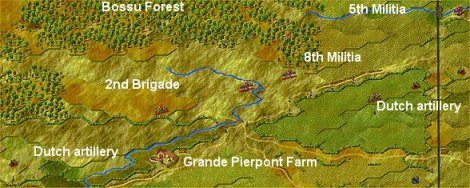
The Dutch 2nd brigade positioned on the western side of the Charleroi-Brussels road, southeast of the Bossu Wood.
To give the French the impression that there was an entire Allied army in front of them, General Perponcher, commanding the 2nd Dutch Division, had placed his troops as widely across the battlefield as possible. In front of the battalions a wide screen of skirmishers was established by men of the 2nd Battalion Nassau light infantry and the 27th Battalion Jagers, which added to the French impression that behind such a large skirmish screen, there had to be a large army hidden away in the lightly rolling terrain and the cornfields. General Reille knew Wellington very well from his experience in the Peninsular War.
The Dutch 2nd Brigade, under Prince Saxe-Weimar, was positioned southeast of the Bossu Wood and strenghtened by the 8th Militia Battalion from the 1st Brigade, after the 2nd Btn. Nassau light infantry was pulled back to the crossroad in the morning to have some rest and prepare soup. This brigade protected the vital Bossu Wood, in which many troops could be hidden; this was the reason why Jérôme Bonaparte’s 6th Division attacked in its direction, with the idea of clearing the wood, and meanwhile flanking the Allied force by sending troops around it on the western side. The Grande Pierrepont Farm was also occupied and a bit further west supported by a detachment of artillery of Stevenaert’s Battery, which in turn was protected by a company of Nassau light infantry.
In front of the 2nd Dutch Brigade you will notice a lot of skirmishers from Line and Militia Battalions; I have not altered anything in the game engine, but simply put these there to add more realism to the battle deployment, as these battalions did send out skirmishing companies during the battle. It also doesn’t interfere in a game as well, as there still cannot be made more skirmisher formations by these battalions.

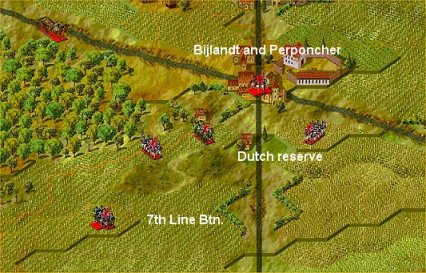
Forward position of the Dutch 1st Brigade from the center to the east of the battlefield.
The central position of the battlefield, crossing the Charleroi-Brussels road, lies in front of the Gémioncourt Farm. Here the majority of both Stevenaert’s and Bijleveld's Batteries were placed, guarded by several skirmishers. The 27th Btn. Jagers had three companies a thousand paces in front of its main body and the 5th Militia was deployed in the vincinity of the farm itself. In order to recreate the determined resistance of the batteries, these are released only at 2.30 P.M, even if this means that an aggressive French player is able to by-pass them or even attack and destroy the guns. The forward positioned Jagers are not fixed in this scenario, as they were immediately withdrawn when the French attack began; they had done their duty, serving as a disguising screen.
The 5th Militia here receives two skirmishing formations, as two of its companies held the Gémioncourt Farm and were sent forward from the main element when they were attacked several times by large French infantry columns and squadrons of Piré’s cavalry. The two batteries were to cooperate with each other in case of a withdrawal, when one could reposition and cover the retreat of the other.
Reserve battalions of the 2nd Dutch Division at the crossroads.
At the opening of the battle, General Perponcher had sveral battalions in reserve near the crossroads. The 2nd Btn. Nassau was there to take some rest, resupply its ammunition and prepare soup for the men, and the 2nd Btn. Orange-Nassau was held back due to a low level of ammunition. Allthough in reality the Dutch troops did not receive new ammunition before the battle had ended, as the wagons were left behind during the night in Nivelles, I have added one ammunition wagon for gaming purposes. A detached battery of the Dutch is positioned on the Quatre-Bras to Namur road to guard the extreme left Allied flank.
The arrival times for Allied reinforcements have been changed slightly, but not to a great degree. The 5th Division of General Picton now arrives at almost the same time as does the Brunswick contingent, of which only two light infantry battalions and its artillery arrived much later around 6 P.M. All other known reinforcements that matter in this scenario arrive at times, we players are famliar with in the currently existing scenarios.
Because the Bossu Wood played an important part in the fight for Quatre-Bras, as it might contain enemy troops for the French, which then would dominate the open terrain east of it from the flank, I decided to place several Victory Point hexes in it. That way the French are at least obliged to head into the wood and the Dutch light infantry can block its way. This game feature is also very common in the current scenarios. Other VP hexes are left as originally designed, so Bachelu’s men can still go forward towards Pireaumont, in case they want to outflank the Allied troops from the right. Gémioncourt Farm is made less important with its VP points, so as not to slow down a French player too much in conquering those wretched chateaux, that usually cost a lot of effort, men and cannonballs before they can be finally subdued. The Grande Pierrepont Farm is given some VP points as there was a fight for it, and it controls more or less the entrance towards the Bossu Wood and the left flank of the French army. The crossroads themselves still remain the major objective for the French to conquer, and thus still receive the highest VP points.
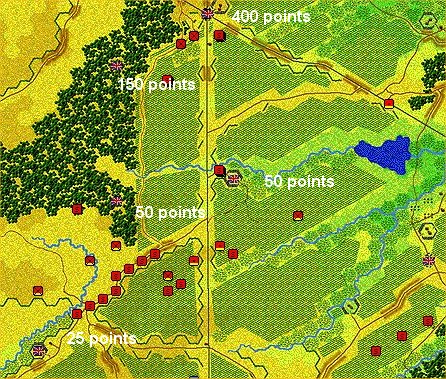
Victory Point hexes on the battlemap.
I hope I have explained enough to you gentlemen on the design of this new club scenario, and hope that whether you’re a French officer or an Allied officer, you will have lots of fun playing it and exploring the new possibilities and problems of this battle.
As I mentioned earlier here, the deployment of the troops has been made as accurate as possible with the game map; my esteemed colleague 1e Lt. Boersma, commanding the 1st brigade of the 2nd Dutch division here at the club, already once commented on this feature in an article: "Quatre Bras: The Maps Use in Battleground: Prelude to Waterloo Computer Wargame" that you can find at the following internet address: http://www.napoleon-series.org/military/battles/c_ptw.html
For some extra reading on the battle actions of the Dutch 2nd Brigade, you can read some interesting articles
"Waterloo Campaign: Nassauers in Netherlands Service" written by Geert van Uythoven, also a club member, at the following
internet addresses: (1)
http://www.vmlh.nl/html_en/article_04010310.htm
and
(2) http://www.vmlh.nl/html_en/article_04010320.htm