Colonial Campaigns Club (CCC)
The Beginners Guide to Campaign 1776
Updated on
December 19, 2021
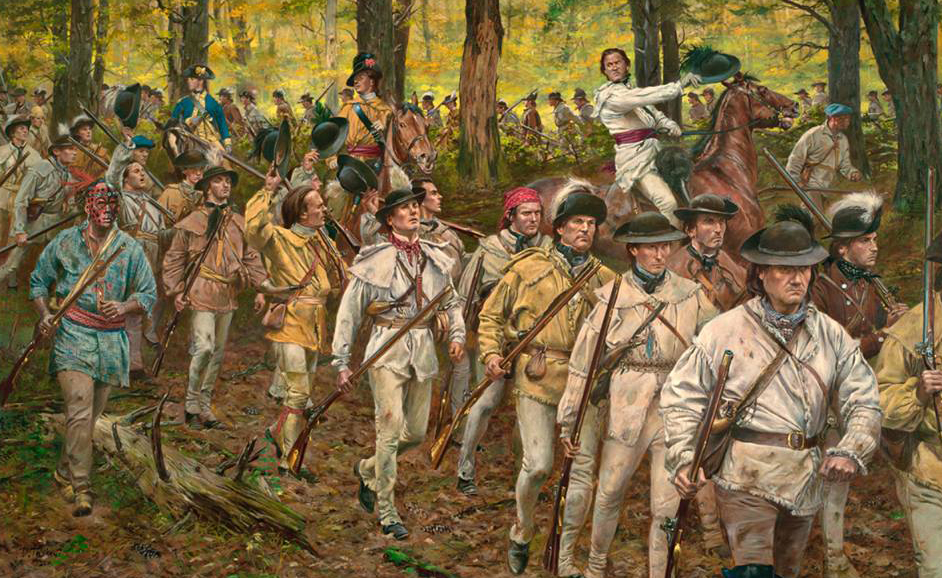
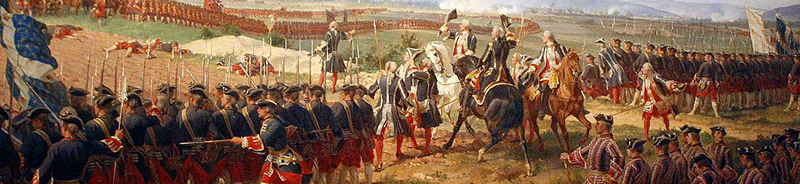
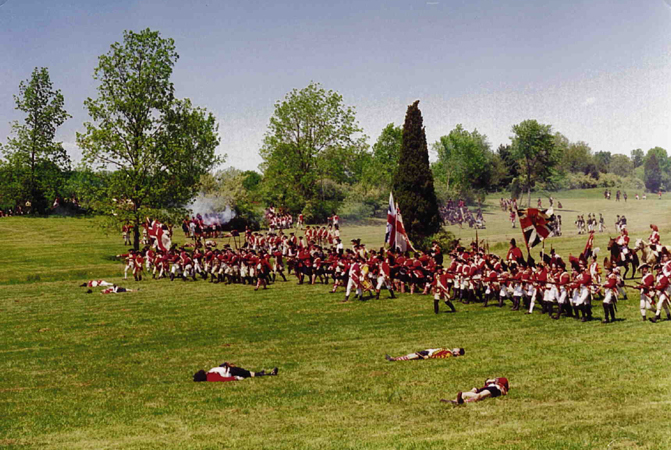
Daniel Morgan at Freeman's Farm - by Don Troiani
Use the following quick links to jump to different sections of the guide.
Introduction -- Weapons -- Formations
Unit Types -- Tactics -- Morale -- Terrain
General Gaming Tips -- Tips & Tricks for the Beginner -- 18th Century Warfare
British Tips -- American Tips
Introduction
So you’ve got the game, played a few battles against the AI – joined the CCC, and now you’re off to offer battle to the first passing enemy officer in the tavern. Well wait a moment!
Before you embark on your campaign to write your glorious deeds in the annuals of history, take heed of some homely advice and read on….
Welcome to a new site developed for new (and not so new!) commanders to the CCC.
This will take the form of an analysis of historical tactics and weaponry used during the conflict, how they developed, and more importantly how to use these concepts in the game. Further on there will be contributions from experienced commanders on playing the scenarios with hints and tips for the beginner.
I make no claim to being a military historian, and this is intended as a low-level introduction to those with little or no knowledge of the period and (hopefully) enables them to grasp the tenants of 18th Century warfare and translate this to the game Campaign 1776.
Although many would disagree, I consider warfare more ‘art’ than ‘science’ – the inherent variables make combat a very imprecise science at best, and factors such as morale and human responses can never be formulated or constantly predicted (in game terms this often means a ‘chance’ or random factor). As such, and all things being equal, tactics and the deployment of troops is usually the decider on a level playing field – but again this rarely occurs in real warfare.
Ultimately the decisions lie with the commander how best to achieve the most from the available recourses and men, what tactics to employ, utilising terrain, formations and weapons to ‘win’ or deny his opponent victory. Often there is no ‘right or wrong’ but there are ‘better or worse’ ways to achieve this.
Remember that not all games are won by the highest body count, objectives and long-term goals must be realized. Bunker Hill was a victory (of sorts) for the British, but the price was incredibly high (1/4 of all British Officer losses in the war occurred in this battle). For the new student I recommend studying the campaign of Gen Nathaniel Greene in the South, who never won a battle but achieved eventual victory, a salutatory lesson to the British in the scope of grand tactics.
Lastly, a brief word on game play and gamesmanship.
The CCC is club a in which all players should observe a certain amount of ‘role-play’ etiquette and manners of the time. Yes winning is good, but in the 18th Century it was the style of winning and/or losing that mattered. As a beginner you should try and understand the tactics and weapons of the time, which in turn influenced the battles and the way they were fought. Do not expect to win your first battles, but try and learn from your defeats – learn the different style of your opponents play, and adjust accordingly.
The game engine is good at promoting ‘historical’ play, and penalises unhistorical tactics – scatter your men all over the map if you don’t believe me!
But we are probably getting ahead of ourselves at this point, so let us consider the factors that influence the nature of combat in the 18th Century – and the most primary of these is namely the weapons.
Weapons
Weapons and tactics are interdependent. When one changes the other changes.
The main weapons of the American Revolution were the muzzle loading flintlock musket, its attached bayonet, and the cannon. Secondary weapons were the rifle and pistol, swords and other cutting weapons. By far, the most common weapon was the smoothbore flintlock musket, of a large calibre, .62 to .75 inch bore, or equal to 16 to 11 gauge shotguns.

Musket
A musket has no rifling to spin the ball. It is "smooth bored" and will shoot both ball or shot, or a combination of the two. The firearms of the period used blackpowder. Blackpowder leaves fouling behind when fired. For this reason, the balls used by the military were undersized, so that the troops could quickly seat the next load down the barrel. The British musket, (the Brown Bess), was 75 calibre and they used a 69 calibre ball. The French musket (the Charleyville), supplied to the Americans, was 69 calibre and fired a 65-calibre ball. They were long barrelled (about 42 inches) and could mount a long triangular shaped bayonet on the barrel. The armies used paper cartridges to speed the loading process and reduce the risk of loose powder being around sparking guns. A wooden dowel about the diameter of a ball was used as a former to make paper tubes. Into this a ball and the proper amount of black powder was put, and it was sealed.
To load, a soldier opened his cartridge box, grabbed a cartridge, bit off the end to expose the powder, and poured a small amount into the pan of the lock, closed the pan, dropped the cartridge (powder first) into the barrel, removed his rammer, rammed it home, returned his rammer, and then "made ready" to shoot by cocking his lock, and "presenting" or pointing, his piece to the enemy. There were no sights, just the bayonet lug near the muzzle. The soldier just looked down the barrel.
Since the ball is undersized, and the paper cartridge is just dropped into the barrel, the ball might come out spinning as the gases behind it escaped unevenly. It might spin in any direction, and fly like a curve ball or be thrown slightly to any side. After 50 yards it was very hard for a soldier to deliberately hit a man sized target.
Rifle
Primarily the Colonial woodsmen, some militia and light units used rifles. The British raised very few units with rifles but had the Hessian Jaegers. Contrary to popular opinion/myth very few militiamen had a rifle.
The rifle is basically a longer musket with grooving to improve range and accuracy and the Colonials were noted for their tendency to pick off British leaders and officers (see Rifefire effects).
The main drawback was the slower rate of fire and lack of bayonet rendering it poor in melee.
Bayonet
The invention of the bayonet changed the face of modern warfare by allowing musket armed infantry to dispense with the plodding pikemen to hold off cavalry charges by turning the musket into potential thrusting spear.
By the time of the ARW the bayonet was the main close combat weapon of the infantry and had been used by the British to great effect; even blunting the charges of the Scottish Highlanders and Indian hordes several years before.
The use of the bayonet was perhaps as much psychological as physical, but the lack of one certainly would effect that units ability to stand up in melee.

Sabre/Cavalry
Hardly changed from ancient times, the sabre, sword or lance could be devastating in melee; particularly infantry caught in extended or in flank/rear attacks. Cavalry duels tended to be of the hack slash and through variety but very little damage in terms of casualties caused. In the game, Cavalry are predominantly light, and the infantry tactics of the day meant that charging home against a formed body of men was not a good idea in practice. Their speed and versatility means they are best used for recon, raiding and seizing positions ahead of the main force. They are more expensive (x2) in terms of points if lost, so care needs to be taken.
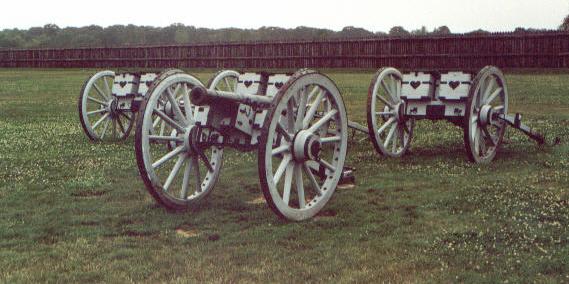
Artillery
The Muzzle loading cannon used were smoothbores, and smaller than used in later wars. Most were 3, 4 or 6 pound guns, mounted on wooden carriages with large wheels. Some 3-pound guns had iron legs to stand on and were called "grasshoppers". Larger guns of 12 pounds were sometimes used in the field, and even larger guns were mounted in fortifications and ships.
The cannon fired solid ball, various small shot, or sometimes shells. Shells are a hollow iron ball filled with blackpowder and fitted with a fuse. The shot used could be buckshot, musket balls or grape shot, which are larger iron or lead balls about 1 inch in diameter. Cannon had a range of several hundred yards. A 3 pounder ranged about 800 yards with solid shot, and 2 hundred yards with grape shot, maximum. At close range, loaded with shot, it could destroy an enemy company.
Cannon were considered useful particularly in siege operations or assaults. Infantry unsupported by cannon usually lost if the enemy had cannon. American Militia units were known for not standing up against British units with cannon support, since they rarely had any of their own.
The drawbacks to using artillery is the need to use the terrain to set up a killing field of fire (often on a hill overlooking open spaces) to utilise its range, its cumbersome turning and limbering to get it firing in the right place (i.e. not very flexible), and the high points cost if lost.
So to relate all the weapons look at the Fire effectiveness table below:
Campaign 1776
Fire Effectiveness Table
Weapon
Type |
Letter
|
R/F |
R/F |
R/F |
R/F |
R/F |
| Musket |
M |
1/6 |
2/3 |
3/2 |
4/1 |
|
| Rifle (no Bayonet) |
R |
1-2/4 |
3-5/3 |
6-8/2 |
9/1 |
|
| Jaeger Rifle |
B |
1-2/4 |
3-5/3 |
6-8/2 |
9/1 |
|
| Mortar |
U |
1-3/6 |
4-13/2 |
14/1 |
|
|
| Howitzer |
H |
1-3/6 |
4-15/2 |
16/1 |
|
|
| 2 Pounder |
O |
1-15/1 |
16/2 |
|
|
|
| 3 Pounder |
T |
1-3/3 |
4-17/2 |
18/1 |
|
|
| 4 Pounder |
F |
1-5/4 |
6-19/2 |
20/1 |
|
|
| 6 Pounder |
S |
1-3/5 |
4-7/3 |
8-21/2 |
22/1 |
|
| 12 Pounder |
V |
1-3/8 |
4-7/4 |
8-11/3 |
12-29/2 |
30/1 |
| 18 Pounder |
E |
1-3/9 |
4-7/4 |
8-13/3 |
14-31/2 |
32/1 |
| 24 Pounder |
Y |
1-3/10 |
4-7/5 |
8-15/3 |
16-33/2 |
34/1 |
| 32 Pounder |
Z |
1-3/12 |
4-7/6 |
8-15/4 |
16-39/2 |
40/1 |
R/F = Range/Fire Value
1/6 means at 1 hex the value is 6.
1-2/4 means at 1-2 hexes the fire value is 4.
(Chart courtesy of Bill Peters)
So, to compare – look at the musket range 4 = fire factor of 1,
but at range 1 (i.e. very close!) the fire factor goes up to 6.
Formations
Typical structure of 18th Century Infantry Regiment
Although there were many types of formations used the most
common basic unit is the Company.
Made up of usually between 20-100 men (depending on recruits,
battle, injuries etc)
This is the ‘core’ infantry unit in c1776 and each infantry
unit represents 1 company.
This company belongs to a Battalion. Usually in the British and
French Armies made up of 8 Line companies, 1 Light Company and 1 Grenadier
Company.
In the game there is usually a leader to represent the
Battalion Commander.
In the US army the number of line and light
companies varied, but the usual practise was 8 companies to 1
Battalion.
In battle the units used line formation and
spread out to maximise firepower.
To represent this in the game 2 companies per hex = 4
Hexes.
Or doubled up for melee = 2 Hexes.
Specialised Units
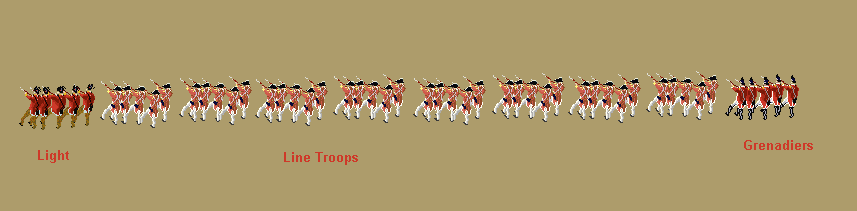
Light Infantry and Grenadiers
Often the flank companies were ‘detached’ to form battalions of
Light or Grenadier troops. This gave the commander an excellent reserve or
advance unit, but was unpopular with many Battalion commanders as it robbed them
of their best men.
The advantage of having a superior unit as opposed to
additional ‘penny-packets’ of good troops was borne out and was common practice
in the ARW.
Legions
These units were composed of groups of infantry and Cavalry, and were the forerunners of the later (and much larger) Corps concept as ably used by Napoleon. Often they were militia or provincial units of whom some did not have horses or rode double, and provided a strike force capable of quick response, but had the staying power of infantry. In reality they often came unstuck if not properly used, or became isolated.
Line Formation
The commonest formation for battle. Companies were drawn up 2-3 men deep to maximise shooting firepower and trained to fire in ranks then reload.
This formation has problems if the additional rule LINE MOVEMENT DISRUPTION is on – as it then reflects the need to ‘dress ranks’ and hold formation, which would slow the unit down.
Units have ZOC from the front 2 hexes – and fire along this front also.
Cavalry are dismounted to use this formation.
Column Formation
The commonest formation for movement. Companies were drawn up 4 men wide to enable rapid movement and changes of direction. Single units in road hexes only pay 1MP per hex. No firing is allowed, but units can melee.
Units have ZOC from the front two hexes only.
Cavalry are mounted to use this formation.
Extended Formation
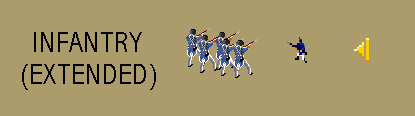
This formation is only available to Light and Militia units. It represents the unit in skirmish or ‘dispersed’ formation – not shoulder-to-shoulder, but it still could have structure. It allows the same firing as line, and receives less chance of casualties from shooting. It is however weak in melee and easily swept away.
Units have ZOC from the front 2 hexes – and fire along this front also.
Also it is worth mentioning that Indian units are always "Extended" when in Line formation, as they did not fight as "formed" units, but rather loose order troops.
Various Other Formations
Why such tight and rigid formations then?
To compensate for inaccurate shooting, the men fired volleys, sending a mass of balls toward the enemy, some of which should hit. In order to fire volleys in unison, they formed into units of two or three ranks (lines) deep, shoulder to shoulder. The unit would operate like a machine, led by an officer (assisted by his non –commissioned officers), who would give the orders to load, fire and manoeuvre. Units could turn their lines, form into columns or squares, advance or turn about at the direction of their officers. Early in the war, the Americans did not have a universal system. Each state or even regiment had their own, making command by generals harder. The Americans also did not practice large unit -Brigade or larger- drills early in the war.
The tactics of the day called for each unit to form next to it's neighbour, forming a line across the battlefield. (not necessarily a straight line, or an unbroken one.) They would both defend and attack in these formations, which gives them the name of linear tactics.
The tactics were not designed to shoot down the enemy until he gave way, but to break up his organized lines so that your side could then march forward, in cohesive, organized and linear fashion, and charge with the bayonet. A disorganized unit cannot stand against an organized bayonet charge. Each unit tried to break the unity of the enemy formation so it could charge with the bayonet. Charged units, if not able to organize themselves, would give way if possible- or die spitted.
Muskets could be fired as fast as every 15 seconds. It took a sense of timing to be able to drive a charge home while the enemy was unable to fire and break up your lines.
Rifles, while much more accurate than muskets, also were loaded much slower. It would take at least 30 seconds, and sometimes a minute or more, to reload a rifle. In that time they were often charged with the bayonet, and since rifles were not equipped with bayonets, riflemen usually had to yield to musket men.
Early in the war, the Americans had a shortage of bayonets. When France joined the war, they supplied muskets with bayonets, and the other accoutrements- uniforms, cartridge boxes, etc, alleviating the Americans shortage of arms and bayonets. The French provided a hundred thousand muskets and bayonets during the war.
It is a myth that the Americans won by using cover, while the dumb British stood in the open in ranks to be shot by the hidden Americans. Both sides fought primarily in the open, in formation. When von Stueben took over training at Valley Forge, he put a single standard and methodology into the American army, so they could work better together. They then became a match for the British on the open ground in every respect. The Americans had been hampered by various methods and commands of manoeuvre, with little large-scale drill. Von Stueben changed that, setting a single standard and training the army to use it, and the Americans proved their ability to use these techniques at the Battle of Monmouth. Instead of a regimental way, or state way, there was only the ARMY way. One method, one-way to issue the order.
Certainly on occasion the Americans used cover, hiding behind trees and rock walls. The start of the war at Lexington and Concord is a prime example, and the New Jersey Militia, used it well also, both being examples of partisan warfare. Most battles of armies were fought using linear tactics. Even most partisan battles were fought using some form of linear tactics- they would fire volleys, and often stood in lines.
The Eighteenth Century was a period of constant tactical experimentation and growing sophistication. Technically it saw the introduction of the ring bayonet, improvements to the infantry musket that included the metal ramrod, and an improved flintlock mechanism. Tactical theory moved from deep battalion formations with little flexibility to linear fire lines capable of manoeuvre. Cavalry gradually moved out of the main battle line to the flanks and reserve, and the artillery saw great gains in mobility and rates of fire. Commanders such as Marlborough and Frederick sought new ways to overcome the limitations of their tactical deployments. Professionalism on all levels increased in all the armies of the period. It was also during this century that the first true world war was fought in climates and terrains far from the European norms. New types of troops, such as trained light infantry, flourished in these new conditions. No period can boast of more theoretical development and innovation of tactical doctrine than the eighteenth century.
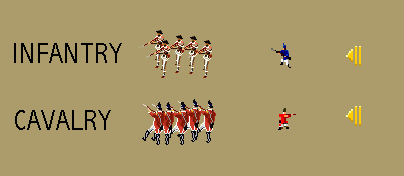
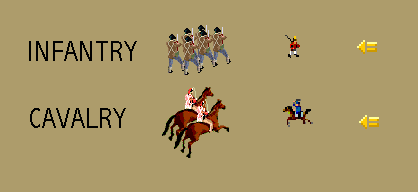
Unit Types
In the campaign 1776 game there are several types of units available to both sides. These can be sub-divided further.
Infantry
The ‘Queen of Battles’ and the most prevalent and prominent troop type of the war for both sides. Terrain made the use of cavalry and massed artillery next to useless, and many scenarios have nothing but infantry units present.
Line Infantry


These are your stock-standard trained infantry in the 18th Century. Trained to fire and manoeuvre in shoulder to shoulder formation and obey orders without delay. Most of the British infantry are composed of this type, as are most of the Continental troops (Regular US), which are more prevalent as the war progressed. They can use line and column formations.
Light Infantry

These were usually specialist troops often from the flank (light) companies and often detached to form a unit of specialists. Trained to fight shoulder to shoulder like other line troops they could also use a skirmish formation, which was more spread out and enabled them to take advantage of cover etc. This makes them more flexible, often with a higher morale. They can use line, column and extended formations.
Grenadiers


These fight exactly like line troops as the use of the grenade had fallen out of favour by the War of Independence, but were often considered elite with a higher morale. Made up of the strongest and fittest men in the Regiment they formed the other flank (grenadier) company in the regiment and were often detached to form elite units of reliable men to spearhead assaults. They can use line and column formations.
Militia

The use of large numbers of militia makes the War of Independence quite different from almost any contemporary European theatre of war. Made up of able-bodied men who could be called out in short notice the militia varied in quality considerably. However many of them had experience in the French and Indian wars or with skirmishes with the Indians. Contrary to popular opinion not every militiaman used a rifle, which were fairly rare, but they could use a spread out formation which enabled them to use the terrain and snipe and harass the enemy. Very few had bayonets, which limits their effectiveness in melee. They often have a fragile morale, which can collapse quickly, however they are a flexible (and often) plentiful force. They can use line, column and extended formations.
Cavalry & Artillery
Although terrain and the lack of mounts limited the number of cavalry in the war they still provided a useful tool in the right circumstances. Due to the close formations of infantry, cavalry charges were rarely effective unless they caught infantry in line or extended order from the flank or rear. The more useful contribution was in the role of reconnaissance, raiding and following up a defeated enemy. They are usually worth double points in game terms to infantry, so they should be seen as valuable and not to be wasted in a prolonged firefight.
Light Dragoons

These are trained cavalrymen able to charge home (in the right circumstances) or dismount and fire from foot. They often have good morale, and often form the advance guard of any attack.
They can use column (mounted) or line (dismounted) formations.
Mounted Infantry

These were men who usually rode horses to move, but dismounted to fight. Often composed of militia they provided a useful fast response force able to capture and hold positions quickly or delay the enemy before mounting up. Their poor morale makes them less effective in melee.
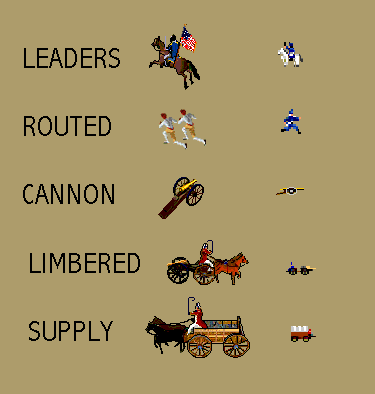
Artillery

Representative of a single gun and its crew, the artillery are your "long range" fighters. They were primarily used as a preparatory weapon to soften up a target, break up an advance, or prevent a force for forming up without harassment. They almost always relocated when an approaching enemy got too close however. Holding the line was left to the Infantry.
Tactics
Tactics of Formation
In traditional warfare victory usually came to the general who could move his army at maximum speed and who could group his forces so they could strongly support each other and do the greatest damage to the enemy. To attain speed, armies marched in columns normally four men wide. In battle the troops were formed in a line. For a column to become a line, the commander need only give a "right face" order, and the column becomes a line four men deep. The column is more useful for marching because it can attain rapid forward mobility. In battle, however, it is handicapped by its narrow front--too easily enveloped from either side. The line, in contrast, lacks rapid forward mobility, but its breadth makes it more suitable for deployment on a battlefield.
In addition to the line and the column, enclosed formations have also been used in the past--either a hollow square or hollow circle. With these formations warriors faced out in all directions against attack. Such formations were difficult to manoeuvre and liable to being surrounded by a superior force.
Tactics of Attack
Direct frontal attack is the simplest way to go into battle. It can also be the most disastrous. During the Second Punic War the armies of Carthage met those of Rome at Cannae, Italy, in 216 BC. The Roman forces were in line formation. Hannibal, the Carthaginian general, had the centre of his infantry in a crescent formation opposite. As the Romans attacked, Hannibal allowed this infantry crescent to reverse itself. Into the space created by the reversal of the crescent ran the Roman troops, only to be enveloped by the Carthaginians as they swooped around the Roman flanks in what quickly turned from a crescent into a circle. At the battle of Marathon in 490 BC during the Persian Wars, the Greek commander Miltiades had dealt with the Persian ground troops in almost the same manner.
One of the most successful tactics ever developed was the flank attack--coming at the enemy from either or both sides. If a flank attack works, the results are much like what Hannibal achieved at Cannae--complete envelopment, or it can ‘roll up’ the enemies battleline. Such an attack can be prevented if a general chooses a site where his flanks are protected.
In the 18th Century the ability to manoeuvre meant that the frontal attack was almost always destined to incur severe casualties, so the oblique order of battle was often used to put pressure on one point in the opponents line, while refusing battle on one wing.
This concept was greatly used by both Fredrick the Great and The Duke of Marlbough, and allows smaller, but more organised forces to gain a local superiority at the critical point in the battle line, often once the enemies line had broken the cavalry would be sent in to exploit and complete the enemies defeat.
Morale
Every general has known that fighting spirit in his troops can overcome otherwise insurmountable tactical problems. There have been many instances where superior numbers were defeated not by military might but by loss of will. They lost because they were convinced that their cause had become hopeless.
Napoleon said morale is to the physical as 3 is to 1, ok that’s great – but how does it help me play c1776?
Each unit is given a morale class – ranging from A (the Best) to F (the Worst) – this value also represents training and espirit d’corps and ability to maintain cohesion during battle.
At certain times units are forced to take morale checks, check for disruption or when attempting to rally. The higher the level of morale class the more likely the unit will pass the test. This means that your unit of A grade Grenadiers are less likely to be disrupted as they take casualties than your unit of F class Militia, equally if using the line-disruption rule during movement.
In fact some low class troops may run away from very little, the first shots or casualties may be enough to cause panic.
Leaders
Units and leaders suffer a penalty if they are ‘detached’ or in other words outside the radius of their superior officer. So to ensure your men fight at the best of their abilities take care to station leaders within the radius of their commanders, and regimental commanders are with or near their own units.
Leaders also are important to rally routed units. The higher the command/leadership factor and quality of troops the higher chance those men will rally and fight on some more. Often the difficulty facing a commander is when to move a leader away from the front to rally routed men. High-level Commanders (e.g. Brigade/Divisional) may be better placed to attempt to rally leaving the Regimental officers to stay with the bulk of their unit.
Fatigue
Fatigue is a measure of how tired a unit is, again it effects morale checks – so a unit with high fatigue is more prone to failing a morale check than one that is fresh. Fatigue can be caused through casualties, receiving fire and engaging in melee.
Fatigue can be regained by resting a unit. If a unit performs no actions (movement or firing) then there is a chance that fatigue will be regained.
Terrain
To say that terrain was a big factor in the Wars in North America is a big understatement. In Europe battles were often fought on fairly open plains to help the commanders keep control and allow for manoeuvring, cavalry and artillery deployment. Both sides would often ‘choose’ a suitable site so that a battle could be fought that was agreeable to both sides.
The North American terrain was quite different and many British officers (and others) came a cropper when trying to fight in the European ‘style’ against Indians, the French and later the Colonials. (Reference Braddock’s Expedition 1755).
Primarily the big difference was the amount of woods, trees, scrub and undeveloped lands which made co-ordinating any large battle a Commanders nightmare. It also greatly affected the line of sight and made enemy positions and numbers difficult to assess.
In this terrain the use of light and militia troops was clearly understood (certainly the British had learnt most of their lessons by the end of the 7 Years War).
The terrain certainly hampered any large use of Heavy cavalry and too a lesser extent that of artillery due to the lack of wide-open areas which favoured their use.
In game terms the terrain effects what you can see, and what you cannot. As the British are often on the offensive they may not know what forces are deployed where and can stumble upon them at short range. Equally the defensive player will may be unsure of the direction and weight of the attack and position his units badly.
This means that reconnaissance; decoy attacks and vantage points all are important factors to consider ascertaining the enemy’s movements and threat level.
Hills - Height increases a unit’s firepower and makes any melee attempt from a lower level harder, so hills are often the strategic defensible areas. Cannon and supporting troops can be stationed to fire ‘over’ units on hills making any attack face higher firepower.
Roads have much more of a significance as they allow rapid movement in what would otherwise be difficult terrain – if you control the roads you can rapidly move units (especially supply wagons and cannon) quickly from one area to another, if not then you will find it a very long slog through the dense terrain to get to your destination.
Ambushes or roadblocks can also be useful in disrupting an opponent from rapidly utilising roads in wooded/difficult areas, and force them to deploy for combat, thereby slowing down their advance.
Woods, towns, buildings, fences and walls offer cover to defenders and minimise the firepower against them, thus reducing casualties – again use of extended formations in these terrains will reduce it further still. However check the ‘facing’ of walls and fences (these lie on the hex edge) – if shot from the side or rear these will give no protection at all, and enemy units that close to an adjacent hex will also benefit from a ‘dividing’ wall or structure.
General Gaming Tips
This section modified from the original ACW document by Dave Moser and
Rich Hamilton.
General Tactics
Use terrain and line of sight to your advantage. Try to conceal your intentions buy keeping as many of your troops out of sight for as long as possible. If you have enough men, try using decoy units to make your opponent think you will be attacking someplace else...
When setting up a defence, always take the high ground with as much cover as possible (i.e. trees, walls, etc. Anything to help improve your defensive rating. Also try to create overlapping fields of fire. If at all possible you want to be able to hit your opponent from multiple directions (with artillery preferably) before he can do much damage to you!
Leader Tactics
Leaders are extremely important!!! I cannot emphasize this too much! You must keep your units together with their Brigade commanders at a minimum and preferably near their whole chain of command. This is even more vital when you are playing the Colonials as the quality of the army makes a route very likely, if not probable!
Infantry Tactics
Movement
Line Movement
There are a few considerations regarding how you wish to move, either in line or in column.
In general, when you are in the vicinity of the enemy you should be in line formation, since fire is not allowed in column formation, although melee is. Movement is most easily carried out in the 2-D normal view mode, as long as you are familiar with the terrain, since this allows you to most easily see the overall view of the battlefield, and how your units relate to each other, specifically, how they relate to other units of the same command. I find it easiest to click on the "next unit" button and then highlight the unit, and then using the command button to find which other units of the same command are present, and then move that command. This allows you to keep your units under command control, which is very important in determining whether they become disrupted, routed, or recover from these conditions to a normal state. Be sure to check the help file regarding command control ratings at the beginning of the scenario to determine the ranges of your command control, since they do vary.
By keeping your units in line formation you allow them to be in the maximum condition to fight should they encounter unseen foes. Remember to align your facing in the way you desire before advancing into "unknown" areas since when they encounter an enemy, their movement points are reduced to zero, and you will not be able to change facing at that point.
A word here is probably appropriate regarding how the units are aligned. One can use the "every other hex" method, which is commonly employed, or the "contiguous line" method of deployment. The advantage of the former is that it allows you to establish a contiguous zone of control along your line, while stacking your units in one hex, making them less vulnerable to your opponents counterattacks, specifically melee. The "contiguous hex" method of deployment has the advantage that your opponent must successfully defeat two hexes to create a breech in your line, but since by deploying in this fashion, it becomes easier for him to do so. In general, I would recommend the "contiguous hex" method of deployment, but there are times when the "every other hex" method is best. Using the contiguous hex method of deployment also allows your troops to benefit from the "Flank Morale Modifier" if that optional rule is selected - which means they get a +1 bonus for morale checks when combat does occur.
One should try and keep reserves behind the front line to fill any holes created by routs, but this is often hard to do, as your opponent will generally try and stretch you line as thin as possible. If you do have units behind the front line, you should probably allow spaces in between them to allow for routs to get through without disrupting your reserve units, as a routing unit moving "through" your reserve units will often disrupt them, making them less useful in the "plugging the hole" function.
Column Movement
Column movement is best used along a road, or when it is required to cross a bridge hex side.
Since many of the battles in the series are meeting engagements, it may be best to send your smallest company ahead of the line of troops moving in column along a road, since if they run into unseen enemies, you may get your smallest unit wasted, but at least the main body is forewarned, and can adjust their movement accordingly. Infantry is fortunately fairly cheap in the scheme of victory points, and if you occasionally get a small regiment pounded on, it may save you huge losses by moving the whole unit as a group along the road. Many players move their units individually, so this may not be a concern for those of you who do, but for those like me who use the "accelerator" form of movement (see the help file), it can save you many uncomfortable moments to have a "skirmish" unit ahead of the main body of troops.
The only time that column movement should be used across the "open fields" is when you need to get a body of troops to a given point quickly, and don't have the time to change their formation into line. Be forewarned, though, that if you are caught in column formation by artillery or counter attacking troops, that you will suffer significant losses by defending in column formation.
Facing
A crucial aspect of c1776 is a units facing. The business end of a unit is its front two facing hexes and line of sight (LOS) is taken from these. Check the unit and battalion at 3D if you are unsure. The main consideration here is when the line "bends" at a certain point, creating a salient. In the hex where the "bend" occurs you may wish to have units facing both angles of the "bend" so that you do not expose a flank to the enemy. As General Longstreet noted, you should be "as sensitive about your flanks as a virgin". NEVER, NEVER,NEVER, expose a flank to the enemy if you can avoid it. If you choose to do so, you will likely pay a significant price, as your opponent will be more than happy to exploit it.
The only real "tactic" involved in most charges is to bring pressure on a salient in the line. As most of you know, it requires about a 3:1 superiority to crack a line, and salient's offer this most easily. Pay attention to these points where your line bends, and make sure you have the maximum number of troops that you can put there, and that you do not expose a flank to the enemy. These areas are the points of the line that are most easily broken.
Fire
Try to make every shot count! For example, if you’re in close quarters and it’s your offensive fire, look for the disrupted units in your enemies line and then concentrate on them. This is especially effective against the Colonial army. By doing this you will greatly increase the chances that some (or all, hopefully) of his troop will rout on the subsequent movement phase.
Any fire should be directed at the most dangerous units. For the Colonials the objective should be to slow the British by disrupting them through serious amounts of firepower. By doing this you stand a decent chance of disrupting his units and preventing him from meleing you successfully.
If you are at a distance try to let your artillery do most of the damage. You can fire at your enemy with most troops from a range of 5 hexes, but your chances of doing much damage decrease with every hex.
Cavalry Tactics
Cavalry has two main functions for me:
Reconnaissance - I try to send out my smaller cavalry units to the enemies’ far flanks and to every high point on the battlefield. If you men can see the enemy, then you as the General can see them! It cost more in victory points when you loose these troops, but properly handled, the information gained can far outweigh the cost.
Rapid response - If you are trying to hold a long front with minimal resources you can keep you cavalry in reserve to help plugholes as they appear. They can cover a battlefield much quicker than infantry, as long as you keep them mounted. Just remember, they can not fire in the offensive fire round after there movement if they dismount, so either dismount at a safe distance and move in next turn, or melee if you think they can withstand your opponents subsequent movement and fire turns.
As a note if you are approaching another cavalry force, remember that they can move a long way, too, and if you do not have your flanks and rear protected you can be surrounded very easily and devastated and have no time to react.
Artillery Tactics
This is difficult to say. On the one hand if you place your cannon on your defensive line you will make your opponent pay dearly for the ground near it and if they assault you. The draw back is you loose a lot of victory points for cannons. In some scenarios you have no choice but to do this, where the terrain does not provide large open areas for LOS. This has been my normal policy, but from recent games I have learned the other method is probably best. Place you art. at high elevations behind your line so they can pick at the enemy as they move closer. If the enemy breaches your line you have them in reserve and can most likely wear the survivors out before they reach your artillery.
Guard your artillery carefully, they are a very valuable asset as they can limber up, move, and unlimber all in the same phase if not moved too far.
Tips & Tricks for the Beginner
Know the Scenario
Ok – possibly not the most ‘politically correct’ tip, but if you know (roughly) the enemy’s deployment and reinforcement timetable you have a better idea of where to start – offensively or defensively. Remember that most veteran players will know the scenarios well, so this means you are not caught unawares or miss where vital objectives are. Remember that ‘human’ players are far more unpredictable (and sneaky!) than the AI so don’t get too confident that your opponent will take the same route or tactics that you’ve seen the computer do….
For the player wishing to experience the ‘thrill’ of a completely unknown battle I heartily suggest the use of ‘blind’ scenarios in which the terrain, units and objectives are unknown to both players – this does however require the services of a ‘third party’ to organise.
First Fire
As discussed under weapons, muskets, rifles and cannon used blackpowder, which rapidly fouled the weapon. As a result the first fire gives a + 25%to represent the advantage of primed and ready weapons. Remember the Fire Table to get the maximum advantage.
Adjust the ADF
The ADF (Automatic Defensive Fire) is used in PBEM games so that each person only has to send 1 mail per turn. This means that in the defensive fire phase the computer automatically handles the shooting. The ranges can be set from OPTIONS menu ADF.
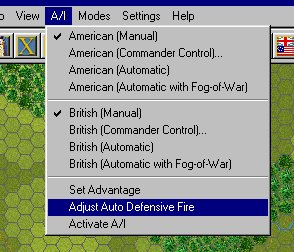
Your opponent does not know what your levels are!
They are Infantry: MIN or MAX and Artillery MIN MED or MAX.
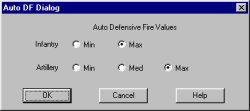
Consider whether you want your men shooting at the enemy as soon as he comes in range, or if you want them to hold fire until they can ‘see the whites of their eyes!’
Of course your opponent may stay out of range and shoot if you set your range too low, so you have been warned, but that is the price of having tighter firing control.
Moving and Firing
Generally not a good idea if you can. Movement severely disrupts the firing abilities (by -25%). Firing is best performed with no movement. A unit that has remained stationary for more than 1 turn gets an additional +25%.
Firing and Melee
Units that have not fired in the Offensive turn get a bonus in melee to represent the ardour of the charge (i.e. no halting to fire first).
Unit Formations
Units get a morale bonus for each supported flank so keep in line where possible, and guard the flanks or flank units, as these will be the weakest link.
Leaders
I cannot emphasize this enough to new players! Keep your Regimental leaders within the Command radius of their subordinate units and your higher level (Divisional, Wing etc) Commanders in the radius of the Regimental ones – thus preserving the ‘chain of command’. This gives benefits to morale (or units/leaders will count as ‘detached’).
Leaders in the front rank can become casualties from fire or melee – but they give a bonus to troops firing or fighting – so whether you want to risk your leaders in combat must be weighed against the disadvantages should they fall. Invariably replacement leaders are less likely to be as able as the originals!
Objectives
Make sure that your objectives are guarded and safe from enemy attack. Much as I deplore the use of single units to ‘raid’ behind the lines (often Cavalry), it is done by unscrupulous players – so beginners need to be aware of this practice and defend or detach units to guard against this tactic.
The use of a raiding force (4+ units and a leader) is acceptable in my book, and constitutes a reasonable use of men in a manoeuvre to attack the enemy’s line of communication or seize an objective however.
The Development of 18th Century Warfare
Many new commanders might be looking at this heading and scratching their heads thinking ‘What does this have to do with the game?’
I believe that an understanding of why warfare was fought in the manner it was will help with the comprehension of the game and the mechanics used.
The 18th Century was called the ‘Age of Reason’ where scientific thought and rational ideas had supplanted many (but not all) of the old religious dogmas and superstitions of the past. The horrors of the 30 Years war in Europe had seen the total ruin of large areas and the de-population of much of Germany and the surrounding states. In the 18th Century this was considered a waste – why wage war if there is nothing to gain economically?
So armies became more professional, with less reliance on mercenaries for the standing army (and hence more loyal to the state), uniforms were standardised to allow identification, and the armies themselves became smaller and more self sufficient. The concept of ‘living off the land’ was frowned upon – baggage trains and bakeries now accompanied the army.
Discipline was needed to maximise the rate of fire, march speed and order to ensure efficiency and utilise the tactical formations. Soldiers literally became automated human robots (Frederick the Great called his infantry ‘walking batteries’) and drill and punishment were increased to reflect this need.
The army became a valuable commodity (often providing important revenue and impetuous to industry) so battles became more one of ‘manoeuvre’ with less ‘wasteful’ encounters, although when they did occur they were often bloody.
Sieges became a prominent feature of campaigning in this time, as well as the techniques of besieging, although these are outside the scope of the campaign 1776 game – see articles on Vaugban for further reference.
The advent of warfare in the new world showed however that the European style of fighting was limited in the America’s, and the appearance of the citizen solider (instead of fighting between ‘regular’ armies) meant that the War of Independence was the first fought mainly on political and ideological terms.
For the beginner fighting for the fledgling Colonies, the image of the stereotyped naïve British Officer, unimaginative plodding foot soldiers and dastardly Hessian mercenaries is probably as far from the truth as can be. The commander with this preconception who thinks he is going to win purely by virtue of his long-range rifles and the enemy obligingly frontally attacking his strongest positions is in for a rude shock and a series of defeats. Even with numerical superiority the Americans will be hard pressed to fight the British on even terms in a set-piece battle. Man for man the Americans may have been better, but unit for unit the British and loyalists had the edge. The bayonet (or lack of) is often the deciding factor in melee, and nothing routs units like melee (or the threat of).
Most (good) British commander are aware of this and will use it to their advantage at every opportunity.
At this point I will hand over to one of my noble adversaries Sir Philip Natta (or ‘Natty Phil’ as he is known) for the British and Crown perspective on c1776, and some hints and tips, Colonial new players should read this also! – Take it away Phil…..
A British Perspective on Gameplay in "Campaign 1776"
By Sir Philip Natta - His Majesty’s 1st Foot Guards
While not the best player in the Colonial Campaign Club, I have gained many victories by what I feel are subtleties that are layered into the rules of "Campaign 1776". Some of the following are opinions that you may not share, tips that you might not be aware of, and personal insights after nearly 45 club games. I hope you find something useful to aid you in many victories over the Colonial forces. I took some hard knocks my first few club games....till I read the entire manual, twice. And I still go back to it each time I have a question or am unsure of some nuance in the rules. This has definitely given me an advantage over someone who's skimmed the manual....(most Yankee players I believe) :) The "1776" #1 golden rule is....if you *really* want to improve your play, check the manual for details when questions arise, and think like the enemy!
Despite the opinion of some, there are several profound differences in the way that the British Army should be handled as opposed to the Colonial Army. With the British Army you have at your disposal a very powerful and offensive oriented weapon. There are few Colonial units that can stand toe to toe with British regular units in sustained fire or melee combat due to the generally better class British units and leaders. This better class of unit is what gives the British staying power on the firing line, and in repeated melee attacks. While there are some scenarios that demand a general defensive stance for the British, as a rule, the ideal situation is an aggressive posture for the British. Conversely, the Colonials play to their strengths when adopting a generally defensive stance. Both armies have a lot going for them with what they do best. I often see Colonial players make the common mistake of treating their forces as the British should be handled. Drawing up a line of relatively small Colonial class "C" units against the usually larger British "B" units almost always yields bad results for the Colonials.
As with most games, to really get an edge in play, you need to read the online manual. The more of it your read the better you'll do, because there are some very important tips scattered around that could easily go unnoticed. For example, buried in the rules is the fact that if you leave a unit (preferably an entire line of units though) unmoved for one turn, it's firepower is increased by 25% in subsequent turns that it doesn't move. That said, it's best to get your lines in a good solid firing position as soon as possible and keep them there as long as enemy units are in their range. After moving, their fire potential drops 25% till left unmoved again. There's a lot of little but important stuff like that sprinkled throughout the rules. You can advance your lines to within one hex range (muskets beat rifles only at this range BTW), and then melee, but you lose a 10% melee bonus for firing. The rules seem odd to me on this point, (I have visions of lines volley firing one round then charging home with the silverware) but the rules discourage that to some small extent.
American rifles are only extra dangerous to leaders with the optional Rifles Effect rule used. Regarding these skittish militia riflemen, you obviously can't sit 5 hexes away from them out of your range, but well within theirs. So eventually you do have to close with them, with your light troops in extended order out front of your line to absorb enemy fire, to at least pour a little fire into the riflemen. The good news is that it often takes only one casualty to sweep these E, F, and D class units away for a little while at least. There are a number of bonuses and modifiers used when attacking militia. Rifles have no bayonets so the attacking unit gets a mod for that in melee, etc.
What I also think is helpful is to study up on ARW tactics (for both sides) or just read a few detailed accounts of some battles. Some knowledge of appropriate historical tactics lends a very real edge in play I think. Aside from just a couple of small but questionable rules IMO, the game does mirror fairly accurately the strengths and weaknesses of both armies in general.
I almost think of 1776 as a chess game with opening moves, a middle game, and an end game. If you just go shoving troops forward with no pre-conceived plan based on the map and initial deployments, chances are you'll fail.
Also get to know the maps and scenarios, from both sides. There's no harm in studying what the enemy can throw at you in any particular scenario, if/when reinforcements arrive, and initial army dispositions, etc.
One more important thing comes to mind, and that is proper and advantageous use of terrain. Learn the modifiers for all terrain and always make it a priority to command better hexes than your opponent does, if possible.
Preventing isolation of units is a tactical consideration that you have to keep in mind from the beginning of a battle. One way to prevent isolation of forces before it can happen is to stretch the enemy position so thin that surrounding your position is impossible. In many respects flanks (and small reserves) are more important in this game than the middle line positions. You lose a flank, you stand a much better chance of being isolated.
As a very general rule, I think most games are played with the following options:
Optional Fire Results
Optional Melee Results
Quality Fire Modifiers
Quality Melee Modifiers
Isolation Rules
Automated Defensive Fire
Flank Morale Modifier
Now if you want to add layers of realism you might want use victory points for leader casualties, partial retreats, and line disruption. I don't think higher fatigue recovery rates or the Cornwallis cannon rules are used very often at all.
Partial retreats slightly benefit the Americans IMO.
Using line disruption basically takes the game from a casual 18th century blitzkrieg style of play to a lot more realistic style. Though it's always a pain in the arse for both sides, the Yanks usually have poorer quality troops so it affects them negatively slightly more than the Brits IMO. But note that this rule CAN really ruin the best-laid plans of mice and Brits too! There's a theory that since the Brits usually have offensive tasks and have to move to engage the Yanks, that it hurts them more, but I don't share this opinion. The chances of American D, E, and F class units disrupting is very great with each hex moved into, in which case one single casualty can then sweep these units away.
Rifle effects only benefit American rifles, never Brit rifles. This rule, though historically accurate, does not make for a competitive game in most cases. Once Brit company leaders are eliminated there's no way that those units will ever recover to good order. It's extremely crippling for the Brit player and in my case is only agreed to as a severe handicap in scenarios heavily balanced toward the Brits. Otherwise, I never ever ever play with this rule.
Read the manual regarding details about all these rules, there are lots of small factors involved. Also adjust your tactics according to the rules that you and your opponent agree to. Obviously if you use line disruption, you won't be able to freely move lines or formations anywhere you want to without a high risk of disruption. Using the leader victory point rule should cause you to be a lot more conservative in their use, for example only put leaders in the front line if they're really needed in an emergency in your lines.
One thing I've been doing lately is pulling all disrupted units out of my firing line till they recover good order. Unless a unit is really beat up, I think only an already disrupted unit will rout. So to avoid some messing routing, shift disrupted units to the rear and plug in undisrupted ones, wash, rinse, and repeat.
Before firing on or meleeing an enemy unit, check it's Unit Box display info. If you have the opportunity to attack a detached unit, that unit will stand a better chance of disrupting or routing.
Check enemy Unit Boxes for unit strengths. If you're facing a stack of two units for example, one having a strength of 2X, the other a strength of 9X, it's far more important to do damage to the larger unit. An exception to this general rule is when you are facing a stack of three enemy units for example, all having starting strengths of 4X. After several rounds of combat, the top unit is now a 2X accompanied by two untouched 4X units. Besides being lower in strength, the 2X unit by necessity has also gained some fatigue points. This adds to the possibility of the unit disrupting or routing should it continue to be attacked.
Check the Parameter Data for weapon ranges to take advantage of range related fire effects. For example, a six pounder cannon has a firing strength of 2 at 8 hexes and 1 at 22 hexes. If it makes little tactical difference, it's preferable to keep friendly units 9 hexes away from the artillery rather than 8 hexes.
It's a little "gamey", but you can set up a stack of units with all top units directly facing enemy units, while a bottom-of-the-stack unit or two can be placed at angles to get in surprise flank shots. Though you certainly risk having these bottom-of-the-stack angled units take flank fire themselves, it's sometimes necessary in extreme tactical situations. I think it has historical merit; it's merely lining up several companies one behind the other, with the rear company deployed at an angle to the top units.
When moving a large stack of units there's no need to move the entire stack together, unless you can see everything in a full six hexes in the direction of movement. When moving near terrain that blocks lines of sight, send out one "scout" company ahead of the stack to expose ambushes, enemy units behind ridges, etc.
Unless you need to eliminate an enemy unit which has "X" strength, spend your fire instead on at least "1X" units. If a friendly 50 man unit fires on an X strength unit, which unknown to you has only 1 man, you've wasted an awful lot of firepower. If you do need to hit X strength enemy units, fire with small or disrupted friendly units.
When conducting serious manoeuvres against the enemy, it's best to time attacks in a turn that the offensive units' leader has passed his morale bonus check. In the Unit Leader Data Box, this morale is displayed as the top letter, A, B, C, etc. If it's displayed as white he's passed his check for the turn and bestows a morale bonus to his subordinate units for that turn. If the letter is displayed in yellow he's failed his check and subordinate units are more likely to fail morale checks for the current turn.
I find it useful to examine enemy fatigue and strength levels after a game is finished. ALL unit data boxes can be viewed after the last turn of a scenario is finished. This gives me some idea of the damage I've given and received on each front of the battle.
Take every opportunity to get every ounce of offence from your units. Put those out of ammo units to work! Such units receive a negative morale modifier but can be very handy for melee attacks against enemy unit flanks where they won't be fired on previous to their attacks. Out of ammo units always DO fire in the defensive fire phase so place these units on high ground, in terrain cover, between and behind two normal friendly units, etc., so that they can fire defensively, but are themselves hard to hit.
If a stack of units intends to melee enemy units, but some of the attackers become disrupted during enemy defensive fire, always get the most out of these units by firing them as opposed to friendly units in the stack, which have not disrupted. (The consideration here is that it's generally best not to fire friendly units which will immediately melee attack, thus getting a 10% melee bonus, and disrupted units won't be able to participate in the melee.)
Units whose BOTH flank sides are adjacent to another friendly units flank side gain a 25% morale bonus. A regiment of 8 companies in a straight line has 6 such units, with the two flanking companies having one exposed side. These are the weak links in the line. Fire on such enemy units and give extra cover if possible to your flanking units.
Terrain is the queen of the battlefield IMO, but good command control is king! Army AND Division leaders give morale bonuses to units in all adjacent hexes to them. Group disrupted and routed units around these leaders if the leaders are not on the line. Brigade commanders only give a bonus to units in their hex, but they serve a much more important function. In order to have all your regiments and their leaders in control, their leaders must be within a 10 hex range of their brigade leaders. Always, if possible, keep regimental leaders within this 10 hex brigade range. Keep all units within 5 hexes of their respective regimental leaders. The American leader range is slightly smaller, so it's usually a good operational consideration to stretch out their command if you can.
Fire on those routed enemy units! Each hit they take causes lost "stragglers" who count as points for you.
Try to use cavalry in a mounted melee capacity since they lose 25% strength when they dismount for firing.
On a psychological note, (yes I've even pondered this :), you can almost feel the desperation or big loss of morale in an opponent if you end your turns with big flourishes! If you think you can successfully and suddenly burst through the enemy line, finally get to spring that well laid trap or ambush, repulse a desperate enemy charge, blitz and take an objective, make that dramatic action the last that your opponent sees as he watches your turn. I know it works because I've been the victim of it myself ;)
Don't underestimate having confidence in your well-trained, well-led British Army. Move your forces wilfully and confidently and favourable things will happen almost automatically.
A Colonial Perspective on Gameplay in "Campaign 1776"
By Cpt. Rich Hamilton - New York Militia
As was the case prior to, and during the revolution, the Continental Army learned quite a few lessons from their British opponents. That holds true today as well, as "Sir Phil" did a very fine job of outlining gameplay from the British perspective. Obviously the items he has pointed out apply to our forces as well so I won't spend the time to rehash the same subjects. A few specific things I would like to cover though follow:
Unit size and quality vs Unit quantity
The British almost always have larger companies numbering in the 40+ to 90+ range. (An exception to this is when the French come in to play, and then force sizes are about equal.) They are most generally better quality also, ranging from "C" type to "A" type for the bulk of the army. On the other hand the Colonials have much smaller companies, sometimes in the teens, and more often are of lower quality ratings.
This seeming imbalance can be a great asset to the Colonial player. The trick is, to make your shots count. You have more options to fire and thus can cover more targets and induce more fatigue on your opponent. Theoretically, 5 10 man units should do the same damage as 1 50 man unit. That is not normally the case though. It would be if all 5 units were fired at the same time, at the same target, but fired separately, and sometimes at different targets, their effect will be much greater. And more fatigue and more losses equal an unstable British army more susceptible to rout. When possible concentrate on the "C" quality troops as the obvious weak link.
Additionally Sir Phil's practice of rotating troops out of the line is much easier to accomplish when you have more individual units. It is an excellent practice and I highly recommend it.
Avoid Melee when possible
The Colonials have the unfortunate situation of having many units being equipped with arms that do not have bayonets. Do not melee with these units if at all possible as they are only given a 25% effectiveness to simulate this lack.
When ever possible shoot then reposition your troops to a location which makes it unattractive to the British player to melee, such as behind a wall or on top of a ledge. Something to where they either can't attack you, or will suffer a sizeable modifier for doing so. Inflicting damage by ranged fire is the best way to win a battle. Your troops are more likely to hold their ground and will also incur less fatigue.
Position, position, position
Going hand in hand with the above two items, and other references within this document, the key to success is position. Whether you are defending or attacking, the ground you control will make a world of difference. As the Colonial player you will find yourself defending quite often. Search out localities in which you have clear fields of fire, and opportunities to create enfilade fire as well (hitting them on the flanks as they approach). Also, a clear path of retreat if necessary, so you can form a second line to fall back to. Don't let yourself get pinned against a river or other impassable obstacle. It will be the end of your army.
Try to also keep units on your flanks. You never know when those Brits are going to come crashing through the woods and you want to be warned of their advance as soon as possible. Position multiple units in mutually supporting positions to cover all approaches to your defensive position as you will need them to delay the advance to allow you to react to the new threat.
And ALWAYS keep a reserve. It may not always seem to be possible, but unless you are really lucky, you will always need to use it. And a fresh regiment or two to slap down a British break through could mean the difference between sleeping in your positions or running around in the night, lost in the woods.
Enjoy!
Rich
Return to Training Center Main Page