|
Allied Training College (ATC) Coalition Library |
British Infantry Tactics [Written by Jason Cawley and Published as part of the Cawley Papers] |
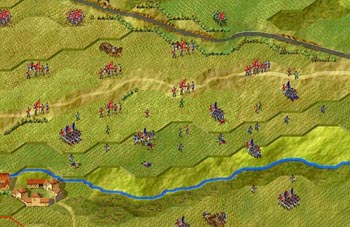
Part I: A Companion Essay for the Quatre Bras Scenario of Prelude to Waterloo Using Picton's 5th Infantry Division on the map of Quatre Bras, a battle in the Waterloo Campaign of 1815, this document illustrates the principles discussed in the British infantry tactics article Fire Tactics - Picton's Division. Further items from some of the other articles in the series are mentioned as well. Opening Deployments Picton's 5th Division is deployed on the field southeast of Quatre Bras, to defend the line of Gemincourt brook. Assume there are other units more or less covering the flanks but facing other French forces. Opposite, Foy's 9th Division prepares to force passage of the brook, to give Pire's supporting cavalry division room to deploy on the open ground north of it.
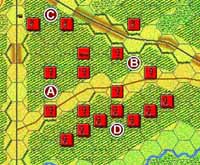
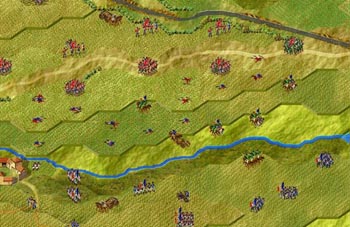
British Positions Looking first at Picton's deployment, Pack's 9th British brigade is on the British right (A), Kempt's 8th British brigade is on the left (B) but with the Royal Green Jackets fighting as lights. Best's 5th Hanoverian brigade is in reserve closer to the crossroads (C).
The front of the division position is screened by a skirmish line (D), thickened by the Greens (assuming they haven't been detached elsewhere). The main position is drawn up in two lines of line-formation battalions laid out in the famous 'checkerboard', with the rear-rank battalions ready to advance to the gaps between the forward ones if warranted. A variant would have the 1/79th, on the left of the division, in the second rank and deploy it to extended line to give 8 battalions in effect. Leaders are initially with the rear-rank battalions, which are sheltered from LOS and artillery in the low ground north of the east-west brook road. The Hanoverians, in two columns, shelter in the next gully northward, right by the crossroads. Notice how the Green's rifles also reach clear across the 'stadium' of the brook depression, to the ridge opposite. If you select the hex the French battery is in (34,35) and see what hexes are visible from that crest position, you will see that the rye hides all but the British skirmish line from the French on the south bank. The rear rank and reserve is even hidden from view of the hills on the French left, (24,35 or 28,38), but the front rank is at least covered from the men directly opposite. Foy sees a skirmish line; higher ups tell him it is supported by what looks like a British brigade in line, back in the rye. That is all he knows at first, although he can guess much of the rest.
French Positions Looking next at Foy's deployment, he plans to attack in waves. This is mostly because of the poor terrain - much rough, a stream to cross, up-hill and rye, and the British looking down on the advancing French. Foy fully expects the first wave may falter in disorder and be unable to advance, while more men with them would only make the disorder general. But he hopes it will get him a foothold on the north bank and disorder the British, allowing his second wave to push up onto the high ground when it relieves them.
His 2nd Brigade (Jamin) will lead off, with the 4th Light on the right (N) and the 100th Line on the left (O). The lights at this point are in a supported skirmish line formation, with their 1st battalion not yet deployed and instead supporting the other two. The 100th Line starts off in a regimental column to manuever across the stream, Foy leading it personally. Behind this brigade is the 1st Brigade (Gauthier), out of rifle shot and mostly sheltered in the rye (P). They are deployed in three columns across the front, the flank ones each regimental strength, the center one only a battalion. The single battalion in the center is intended to switch to line formation once across the stream, to transform the whole 1st Brigade formation into a large 'ordre mixte' deployment of column-line-column. But that is planned for the second wave. Once the British are forced back from the crest and rifles therefore no longer bear on the slopes, and assuming there is room and order enough, Pire (Q) will cross the stream and then try to re-order has best he can in the low ground, sheltered by the French infantry ahead. When he is reformed, he will charge, sweep away the British, and win the day. That is the French plan, anyway.
|
||||||

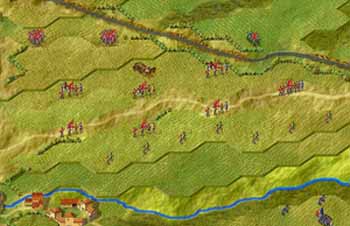

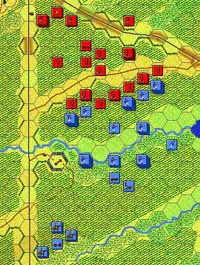
Part II: French Advance and British Response The French Advance Jamin's brigade crosses the stream in a rush, and skirmishers begin trading shots. The French are shooting up-hill so the hit no one really; the British are shooting down and some are elite so they account for a few French and disorder a few more, but nothing too serious. The French formed have sheltered in the low ground, out of site of the crest, with their skirmishers higher up the slope to shield them further. Also, Foy himself with the 3rd of the 100th Line seperates from the rest of that column, filling the gap between it and the 4th Light and ready to go into line formation. The British judge that it is premature to advance to contact; their skirmish line is still fully intact and there is the battery opposite, and no immediate French formed infantry targets. So they wait and shoot a few more French, while advancing the skirmish line 100 yards in a few places to deny the French more ground than they have already grabbed, at least temporarily. In the following turn, the French drive into the British skirmish line in earnest. To do so, they advance the formed battalions into their own skirmish line, and after taking fire melee forward up the slope. The skirmishers remain behind briefly to avoid disorder from the melees. They are successful, punching up the slope in 4 locations, and in the next command phase 3 British skirmish companies rout away. But they have also lost 275 men to the British 125 so far, and their formed battalions have taken 8 fatigues between them. Still, it is nothing serious and this first phase has gone well for the French.
The British Response Analyzed In this second figure we see the position as the British get to react to the driving in of their skirmish line, which is now quite generally in disorder. They will do so using by advancing to contact with their first line of formed battalions, naturally. In doing so, they will face French battalions mostly in column, and without their skirmishers present in the same hexes, since they avoided advancing to avoid immediate disorder. This is what sets up the first occasion of the famous confrontation of British lines with French columns. And notice, it is the Brits that are locally attacking, as they advance in silence out of the rye, to contact. They get a few hits, disordering the 3/100th Line (Foy's line formation battalion) and routing the 3/4th Light on the French right flank. Jamin's brigade is now only 69% in good order, but they continue their attack, trying to carry disorder into the British ranks.
|

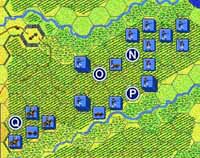
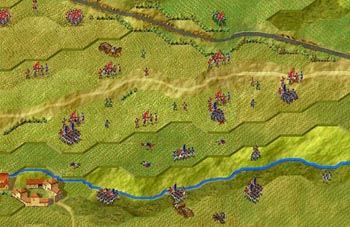
Part III: The British Advance to Contact and Fire Phase The British Advance to Contact In this illustration you can see the formation of the British on their advance to contact. Disordered skirmishers who could pull out of the line to reorder did so, but enough were left to fill the gaps between the formed battalions. Those advanced one-each on the French intruding formations, and present a solid ZOC wall across the engaged frontage.
The French Response In the French response, they retreated the disordered 3/100th Line, but notice the weakness that sometimes occurs with such 'mixte' formations as opposed to columns. Disordered, moving backward, and in rye, it takes 4 of the 6 MPs the battalion has to back up one hex, which doesn't leave enough for the next. So the disordered line has a tendency to wallow where it was hit. At 275 men after its losses, it is also not very safe from melee by a battalion or two opposite. And its additional firepower is nothing to get excited about - 8 fp at point blank when not moving, once disordered, in this case - hardly capable of standing toe to toe with the Black Watch, a good order 2-rank British line, which gets 42 firepower. For this turn, the French commander will cover for this weaker area of his line by directing the fire of his supporting battery on the Black Watch. The rest of the 100th Line fights in a column with its skirmishers retained in the hex, thus giving 4 little shots of 1-4 fp each. It is also 4 targets to hit, and moves better disordered, but obviously such deeper formations also use upmore men per bit of frontage. Meanwhile, on the French right, the 4th Light fights in a supported skirmish line formation with its two remaining good-order battalions. It can dish out 9 little shots in this arrangement, each just a company firing. The anchoring columns provide the added stiffness needed to prevent being pushed back in melee by lone battalions; if there were any cavalry about, they would also provide the chance of square and safety for the skirmishers from that threat. The 1st Brigade, meanwhile, edges down closer to the stream, ready to charge across for the second wave when Jamin's men falter. The French will take whatever fire the British dish out, and hope to get disordering hits with their own, offensive-fire response (their first, notice, on the British formed battalions). The 100th Line column will even press into melee in a body if they fail to get hits, because the intention is to disorder the British line as much as possible, and there is relief behind.
British Fire Phase and Follow-up The fire from the Brits is fierce, and drops 150 men and disorders 2 more French battalions. The reply gets 75, all from the 4th Light, and will disorder the eastern two British battalions at the least. The French then press to melee on the west end, but lose the resulting 3:2 +0 attack, losing 75 men to the British 50. But they will probably disorder that battalion too. Jamin's brigade thus spends its 'first wind' in the first 45 minutes, with only 600 men in the brigade left undisordered, and the 100th Line in yellow fatigue. But he got the desired foothold, drove in the skirmish line, and disordered most of the British front line. He also lost men nearly 2:1 against the British, however, with 550 French down to 275 British. Next, the British will have to relieve their disordered forward men where they can. This they easily do, by merely backing up their disordered lines and sending the second rank forward. They retain one good order battalion, the Gordon Highlanders, in the second line as an immediate reserve. The second rank easily shrugs off the defensive fire of the disordered French, and delivers its own fire, plus a skirmisher pushed back with the bayonet on the west end of the line. This is too much for the fatigued 100th Line, which gives way in rout. The 1/100th Line is in red fatigue and down to 175 men, plus its 50 detached skirmishers - still a loss of 200 out of 425 men in the battalion. The other two battalions are in yellow fatigue and the regiment has lost 400 out of 1200 men overall or 33%. The 4th Light suffered a comparatively light 250 out of 1575 or 16%. One battalion is routed and another disordered, but about half the men are in good order and fatigue is green. They will be back; the 100th Line will not. But both require immediate relief. The 4th Light handles this particularly well, simply leaving a skirmish line along the crest as the rest of the men withdraw. The more scattered 100th Line must simply do what it can; it will be an hour before it is a fighting organization again.
|
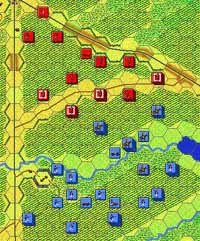
Part IV: The French Second Wave and Cavalry Charge The French Second Wave Gauthier's men launch the second wave with elan, pressing into melee on the battalion ahead of the routed 100th Line and carrying it back. They account for 150 men with their assault, and effect the first serious push into the British formed infantry position. The QL 5 British hit refuse to rout however. It is time for the British to show the counterattacking abilities of their favorite formation. Because the French have pushed to a hex just recently occupied by a British battalion, they have effectively 'entered' the British formation, ending at a location the British can fully predict ahead of time. Their local reserve battalion can then suppliment the efforts of those nearest the penetration to deliver a fire counterattack on the flanks of the intruders. It is in the structure of the British formation that there will always be such a flank open somewhere with such intrusions. In this case, the Gordon Highlanders deliver the attack. Meanwhile, on the east side of the position, the French skirmish line (left by the 4th Light) was up against the British formed battalions of Kempt's brigade. Rather than stand to be disordered and fatigued by light infantry, without replies being effective, the British pull back the battalions slightly and reconstitute their skirmish line along that portion of the position.
The Gordon's lose 25 men to defensive fire, but it has no effect on them. Their own volley and that of their neighboring battalion, the 2/44th Foot, between them drop 100 men from the intruding 92nd Line, settling scores for the previous melee. The leading battalion was at fatigue 3 before this fire phase, and was hit through a flank and pushed to fatigue 4 at the same time. It predictably routed, carrying away a skirmish company and disordering the remainder of the 92nd Line. This reduces Foy to 3 good-order battalions in his division; 3 more are routed and the remaining 5 are in disorder. He needs time to rally.
The Cavalry Charge But Pire will try to push over the stream under the shelter of the remaining French skirmish line established there, even as the French infantry pull back. It is a gamble, but the only chance to retrieve the aims of this crossing attempt. Pire charges across the stream as the infantry pulls back, and 3 of his 4 regiments reorder on the next French rally phase.
But in the meantime, the British have moved to adopt anti-cavalry formation, pulling in their skirmishers to the same locations as their formed battalions, getting disordered battalions to the rear rank, and re-establishing intervals between battalions when necessary. The reserve of the Greens also comes up to extend the line of formed battalions, covering Kempt's left. Pire presses menacingly close and threatens to charge the forward British battalions, but the whole front rank, 5 battalions, smartly form their squares at the command, without wavering. Watthiez might consider pressing home on the 3/1st Foot to try to break their square with his lances, but it does not look promising. The neighboring squares would simply press in on his flanks and deliver fire, even if his charge succeeded at first. No, just the cavalry will not do it. And Foy has not yet really rallied to assist; only half his men are back in good order. Pire is out on a limb and will probably have to come back as best he can. At least his threat prevented any thought of pursuit of Foy's men as they retreated.
|


Site Designed Maintained by Scott Ludwig & Walt Moehle (Coalition Army Webmasters) © 2005-Present September 15, 2024 8:49 AM |