|
Allied Training College (ATC) Coalition Library |
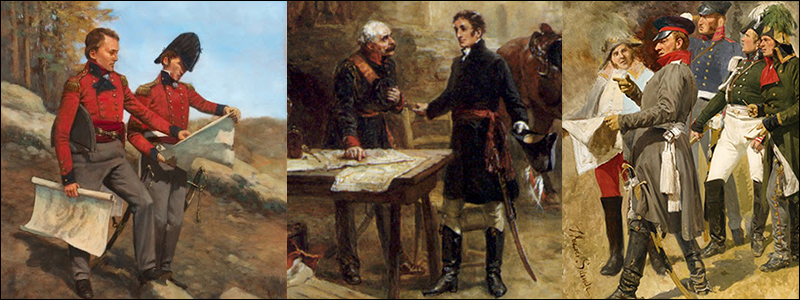
On the Use of Combined Arms in Battleground Games |
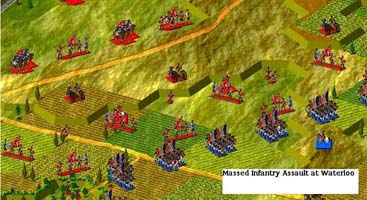
Remember the old children's game, 'Rock-Scissors-Paper', where at the count of three you'd thrust out your hand indicating your choice and shouting, 'Rock beats scissors! I win!' Each of the three choices had a counter, something that could defeat it if it was alone. Choosing the rock left you vulnerable to the paper, which in turn could be cut by the scissors, which could be smashed by the rock. Employed alone each element of the Napoleonic army can achieve victory, but only at great risk and even greater luck. Your opponent must fail to guard against your assault and allow you to win. With the increase in training and the abundance of manuals available for study, counting on luck is no longer a successful strategy. All arms: Infantry, Cavalry, and Artillery must be combined with maneuver to dislodge and rout your opponent. The following examples illustrate the truth behind the maxim, 'Infantry, cavalry and artillery are nothing without each other...' Example 1: Overexuberance and overconfidence at Waterloo
The French columns have pushed back the British skirmishers and cresting the hill reveals the enemy in extended line in front of the forward batteries. Bachelu and Foy's divisions form up in a massive assault. It's an urge we've all felt, a massed infantry assault to quickly and decisively break the enemy line and seize a position, in this case the Mt. St. Jean ridge. The columns will only be under the enemy guns for a turn or two, too long to set up a battery. The opportunity to disorder and eventually destroy the enemy guards is simply too good to pass up. Well, you can imagine the results...
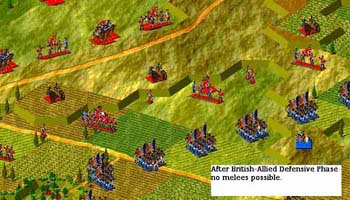
The artillery batteries on the ridge caused fatigue and casualties on the tightly packed columns. The front ranks of the British elite Foot Guards poured in lethal volleys before retiring on their reserve. The French columns are now exposed, too far away to bring the enemy to the bayonet. The optimistic assessment of one or two turns is now three. And the aftermath, General de Brigade Gauthier killed, General de Brigade Campi wounded and 1,000 French casualties against 125 British casualties. Before you needlessly sacrifice a brigade, consider the options. The BGW provides the attacker with one key advantage, INITIATIVE. The defender must react to the threat. In the above example, the massed infantry was only a minor threat to the British line, easily countered by changing from extended line to regular formation. The British defense proved a far greater threat than the French attack, taking advantage of bonuses for fire directed at columns, +50% for artillery and +25% for infantry, as well as +50% for infantry firing in 2-rank lines. The British line represents a combined arms defense. Infantry positioned to the front protects the guns, while the artillery discourages enemy assaults. Behind the reverse slope are reserves. Cavalry and horse artillery stand prepared to sweep the ridge clear should any French assault succeed in reach its crest. Assaulting this position requires combined arms. Against the same line, bring forward your skirmish line to harass the enemy front, supported by battalions in line formation. Units that move suffer a 50% reduction in their fire in the offensive phase. You won't inflict large numbers of casualties, but you will threaten the infantry. Leave one hex gaps between your battalions to provide room for cavalry to charge, a larger threat. Finally, bring guns up on the ridge opposite the enemy battery. They may not be able to fire this round but their presence is a third threat. Example 2: Combined Arms
After crossing the ridge spur northeast of Hougomont, the French commander brings forward guns and cavalry support to threaten the enemy line. The British decide to remain in position and guard the guns. On the following turn, the foot batteries are supplemented by horse batteries that were hidden behind the reverse slope; thus giving the French twice as many batteries in position. The British line now faces a threat from each arm. What will they do? The attacker has now put the defender in a difficult situation. In this example, I left the infantry in place. They could have withdrawn behind the reverse slope, but that would leave the guns vulnerable to sweeping cavalry or massed infantry assaults (as often happens in Waterloo battles in the NWC). Withdrawal is as good as giving up on the guns. Against the combined threats, holding position is not much better. A cavalry charge by the French could still reach the guns and inflict losses on the Guards infantry in the process. Forming squares would protect the guns, but each would almost certainly be disordered by cannon fire and musketry. Any defending unit that suffers casualties in the offensive phase will be disordered the next movement phase (or possibly rout for lower quality troops). A good tactic against extended lines is to disorder both sections with artillery and musket fire. This leaves them stuck in line formation and vulnerable to assault and melee on succeeding turns. Regardless, the tactical advantage lies with the French. Why? They still hold the ridge, and our forces are no closer to the top of the hill. Because this is a battle of maneuver, the decisive action does not happen on the first turn of contact. The enemy front is now disordered and cannot retreat behind the slope in less than 2 turns. They are now exposed to four rounds of artillery fire from the massed French battery safely out of range of an enemy charge. True, you are no closer to the objective hex, but tactically the cream of the enemy army is isolated by a demonstration in force, allowing other units to move up under cover of the terrain and around the flanks. The combining of the three branches of arms gives the attacker this advantage. [Written by Jeff Bardon as Published in the Napoleonic Wargaming Club (NWC) Newsletter]
|

Site Designed Maintained by Scott Ludwig & Walt Moehle (Coalition Army Webmasters) © 2005-Present September 29, 2024 5:59 PM |